
Welcome Aboard!
ABOUT THIS LESSON
Welcome to the LeadBoomerang Onboarding Course.
Here's what we'll be covering in the next few lessons:
Pipelines
ABOUT THIS LESSON
Opportunities Overview
This is an overview of your opportunities tab. To start, you can see the default view all your opportunities or leads, whichever you prefer to call them.
Step 1: Filtering the Opportunities
- There are options to to filter the Opportunities section to view specific opportunities over a period of time. You can view all time, or small to large increments of time.
- If you have any specifications of a timeframe that you'd like to view your leads for this is where you can do that.
- You can view the date that the leads were added.
- You can also sort by ascending/descending.
- You can also filter by pipeline, owner, and campaigns.
Step 2: How to Add an Opportunity
- Click the +New and fill out the pop-up window to create a new opportunity.
Step 3: Downloading Opportunity Information
- Click the download icon to download Opportunity information
Step 4: Use “Additional Info” as a tool for filtering.
- This section will remember what you’ve previously selected. You can filter by leads that have an assigned task, calendar events, notes, etc.
When viewing your opportunities, you can click into one and view tags, open a conversation, contact the person, add a task, and more!
Account Settings
ABOUT THIS LESSON
Account Settings Overview
Here’s an overview of your account settings. Some of this is basic information, yet it’s critical so you can have a good foundation and be set up for success with using the system. Below we will highlight some of the most important and foundational elements.
NOTE: Depending on your user settings, you may see different options in your settings than shown in the video.
Company Settings
- Upload, change, or remove a logo
- Company information, including name, email, phone number, website
- API Key: You can use this for Zapier and API integrations
- Setup company address
- Time Zone - this will impact your triggers, appointment booking, and more
- General settings (toggle on or off the following):
- Allow duplicate contact
- Allow duplicate opportunity
- Merge Facebook Contacts by Name
- Disable Contact Timezone
Team Management
In this section you can add or remove users in your account. You can add a personal logo for each user too. For each employee, fill out their basic information: name, email, and phone number. You can also add phone extensions here.
- You can set and reset passwords for each user here too.
- You can establish an email signature for each user, which can be helpful for campaigns they are assigned to.
- You can also assign a specific calendar to the user.
In the next section, permissions, you will only be able to change these if you are an admin for your account. If you are a user, you will not have access to this. If you are the administrator, you can toggle on and off the various permissions for the users within your team.
Under User Role, you can assign the user to be a general user or an admin. Again, you will only have access to this if you are an admin.
Call and Voicemail settings: Here you can include an inbound Twilio number here if the user requires a dedicated number. You can also set the call time-out and upload a voicemail recording file.
User availability lets you set up the default availability for each user.
Finally, User Calendar Configuration allows you to connect a Google calendar for a user, if they want to sync their calendar in the system with a Google calendar.
This is where you can set up the email template for the review request function.
SMS
Similar to the email section, this is where you can set up the SMS template for the review request function.
Customize Communication
This is where you can turn on the email or SMS for reviews, so it can be sent immediately after they check in, or show up, and you can have it repeat periodically.
Review Widget
This widget can capture testimonials, so long as you have your Google and/or Facebook integrated. It can pull them up and generate the code to have them referenced on your website, calendar, funnel, or wherever you have the widget.
Appointment Widget
This setting has moved to the calendars page. Please check out our calendar tutorials.
Pipelines
This section is how you organize the flow of leads through your CRM. You can create pipeline stages to track your leads through different stages. For example, you may have your leads begin in the prospect stage, then move to booked call/appointment, then sold. You can customize this section and the pipeline stages however makes sense for your business.
Phone Numbers
Here you can add outbound numbers, forwarding numbers, and number pools.
Calendars
This section is where you can create and manage your calendars. Please review to our other tutorials for full calendar setup specifics.
Templates
Here you can create SMS and email templates that can be used in campaigns. If you want to have templated, formatted communications, you can create the templates here.
Custom Fields
Here you can organize and manage your custom fields. You can create these in the form and survey builder, and they will be listed/organized here. Custom fields are used to create/capture specific fields of information in your system. If you work in a specific niche or industry and have your contacts fill out a form with specific information related to their health, income, etc. you may want that captured information to be saved in a ‘field’ in their contact record. Since the system is designed to capture general information, you can customize it to capture this more specific information.
Facebook Form Fields Mapping
This section will work only if you have the Facebook integration setup. If you’re running Facebook leads and using Facebook forms, you can map the fields from Facebook into the system. You will need to map the fields to work properly in the system.
Custom Values
Custom values are dynamically updating mini codes you can use in email templates, triggers, SMS, and more to pull in information. For example, you may want to have an email that pulls in the contact first name so you can use the “contact first name” custom value which will auto-populate the first name. The template would read “Hello “ and the system will insert the appropriate first name.
Domains
This is where you add in your domain(s), or address people type into the web browser URL to visit your website.
Tags
Tags are a great way to organize contacts. Tags can be used to sort lists of prospects vs. cold leads, different groups of clients, sort contacts by how they came into your system, and more. Tags can be used to trigger events in the system. Here, you can manage your list of tags.
Setting Up Your Contacts
Step 1: Access your Contacts section. Navigate to Contacts > Contacts/Smart Lists.
- The main page displays a list of all your contacts and basic information like name, phone number, email, when they were created, last activity, and tags.
- By dropping down the columns menu here at the top, you can update which columns are displayed.
Step 2: How to Search and Filter through your contacts.
- You can also use this search feature to do a quick search by name, email, business name, tag, or phone number.
- (Check out our Smartlist video/article to learn more in depth about how to use these filters), but here this allows you to sort by very specific information.
Step 3: Additional Actions
- Using these Actions icons at the top, you have several options for adding or removing contacts, and applying bulk actions. Our Bulk Actions tutorial gives a full overview of each of these actions. The most foundational are:
- Add contact: manually add an individual contact record
- Export Contacts: select a list of contacts to export to your computer (the file will download as a .csv Excel file)
- Import Contacts: Add a list of contacts into your system, using a .csv file
Introduction to Conversations Tab
Integrating with Google
ABOUT THIS LESSON
Integrating with Google allows you to sync your calendar to your Google Calendar as well as for reporting related to Google Ads.
Part 1: How to Integrate Your Google Account

Setup Your Calendar
ABOUT THIS LESSON
How To Create and Utilize Teams With Your Calendar
Creating a team in your system is one way you can organize users and conveniently manage a collective calendar. Team Calendars are often useful when you have multiple users that operate within the same appointment type. There are many use cases for Team Calendars. Follow these steps to learn how to create new teams which will also set up a unique calendar group.
Step 1: Set up a Team
- Navigate to Settings > Teams > +Add Team to create a new team.
- This will open the team setup menu.
- Under ‘Team Info” choose a name for the team and select which users will be included as a part of this new team.
- Toggle on or off the option to “Apply selection change of team members to the existing calendars which got linked to this team.”
- Under “Calendar Team Configuration” provide a name and description for the team.
- Create a unique slug for the URL associated with these Team Calendars.
- Toggle on or off the option to “Assign contacts to their respective calendar team members each time an appointment is booked.” When ON, contacts will be automatically assigned to their respective team member whenever they book an appointment.
- Click Save.
- When your team has been set up, you will be directed back to the teams tab and will be able see your newly created team.
NOTE: You can check out our other tutorials for a detailed walkthroughs on calendar set-up for detailed assistance with the configuration and settings.
Step 2: Access the Team Calendar
- Navigate to Settings > Calendars and you’ll see the team calendar section directly linked to the team you just made.
NOTE: Only users assigned to the team are able to add appointments to the calendar. If you wish to manually schedule an appointment within a team calendar, you must be a user assigned to the team. (This can be managed in Settings.)
How to Create and Edit an Unassigned Calendar
This is an overview on how to create and edit your 'unassigned' calendars.
Step 1: Create a New Calendar or Edit an existing Calendar
- Navigate to Settings > Calendars
- Click on +New Calendar to add a new calendar OR click the … next to an existing calendar to open the menu to edit it.
- A popup window will appear for you to customize the calendar.
Step 2: Fill out Tab 1 - Team and Event Setup
- Choose the Name, Description, Title, and Meeting Location
- Choose an event color for calendar syncing.
- Choose a linked calendar (if you have a Google calendar synced.)
- Choose a sync option - one-way, two-way, or disable trigger.
- Note: we have a full tutorial covering the different options.
- Save and Continue to the next tab.
Step 3: Fill out Tab 2 - Availability
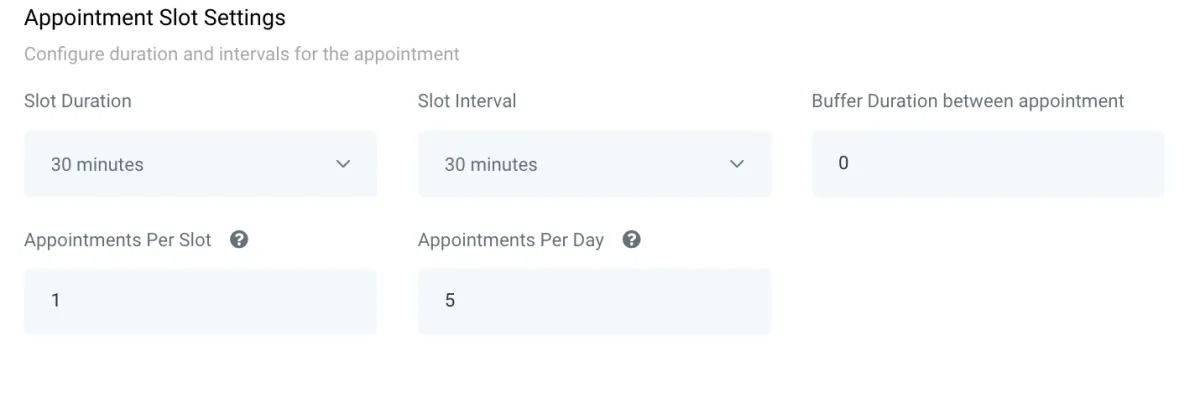
- Fill out the “Appointment Slot Settings” to configure the duration and intervals for appointments. Here you can customize how long an appointment slot is, if there’s a buffer of time between appointments, how many appointments can happen at once, and how many per day.
- For example, if this is a 30-min meeting calendar and you want to schedule 1 appointment per time period, with no buffer, and you’re comfortable with back-to-back appointments with no buffer, but you want to max-out at 5 per day, you’d set the slot settings up like this:
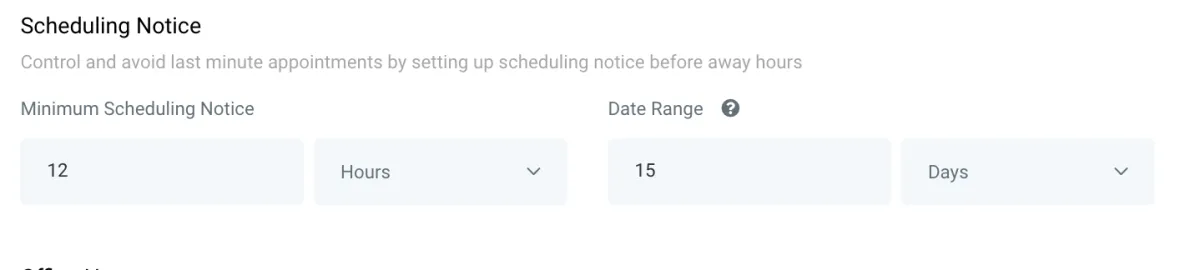
- Continue on to the Scheduling Notice section where you can set up the timeframe in which appointments can be booked. This can help prevent last-minute bookings, or bookings too far out.
- The minimum timeframe can be set by hours, days, weeks, or months. The maximum time frame can be set by days, weeks, or months. The example below shows a minimum of 12 hour notice, and a maximum of 15 days out:
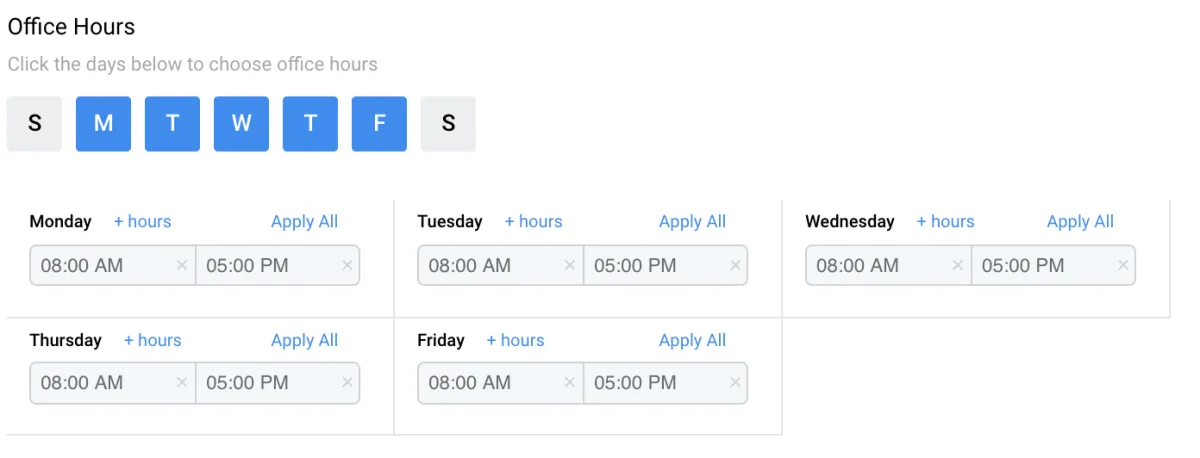
- Set your “Office Hours” by clicking On or Off the days of the week you wish to set hours for (blue means you have availability). Then, determine the hours for each day. Here we have Monday-Friday 8am-5pm set:
- Save and continue on to the next tab.
Step 4: Fill out Tab 3 - Confirmation
- Under “Form Settings”, you can choose a custom form if you’ve created one you want your contacts to fill out before their appointment/calendar booking.
- Sticky contact, when turned on, will remember the data the contact enters and pass that on to other forms, surveys, payment information in the funnel, etc. as they work through your system.
- Stripe payment can be toggled on here if you wish to charge for the appointment.
- Note: You’ll need to have an integrated Stripe account; check out our other tutorials on that.
- Under “Notification & Additional Options” you can auto-confirm appointments, send an alert email, allow Google calendar to send an invitation or update emails to the attendees, and enable rescheduling and cancellation.
- Note: We do recommend that you update this custom value to be appointment.rescheduling and appointment.cancellation link if you plan to use these here or in campaigns.
- You can add a Facebook Pixel ID which will come through as a scheduled event.
- “Custom code” allows you to enter HTML or Javascript (not CSS) that you want loaded into the calendar.
- Fill out the “Form Submissions” section to determine if you want a customized ‘Thank You’ message, or if you want them to be redirected to a URL.
- Click “Complete” to save your changes.
Integrating Zoom
ABOUT THIS LESSON
The Zoom Integration feature allows you to generate unique meeting links for appointments within the Team Calendar section of your system. (To learn more about setting up team calendars, check out our calendar tutorials.) If you yourself are your team, you can create a "Team" of 1 person for your team calendar. Follow these steps to learn how to Integrate your Zoom account.
Step 1: Integrating Zoom
- Navigate to Settings > Profile.
- Scroll down to "Integrations" and click Connect next to Zoom.
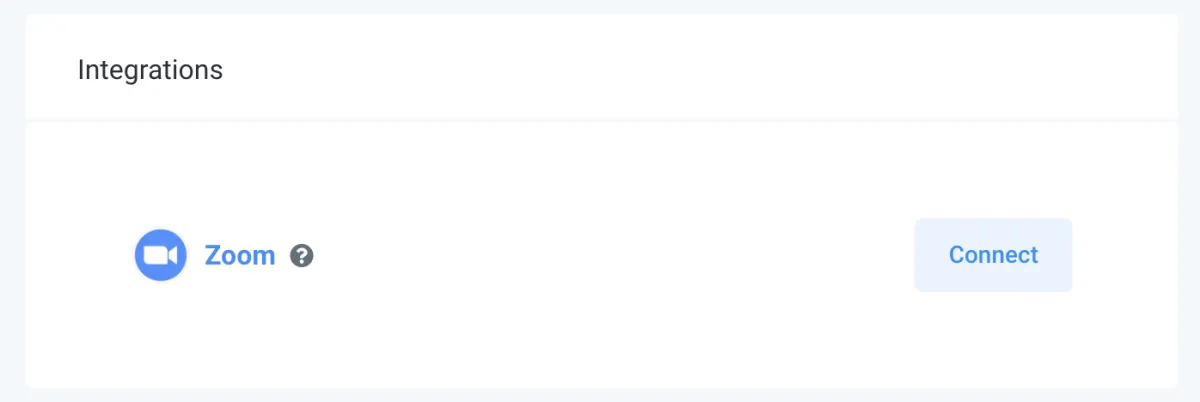
- This will direct you to the Zoom sign-in page. Enter your Zoom credentials to log in.
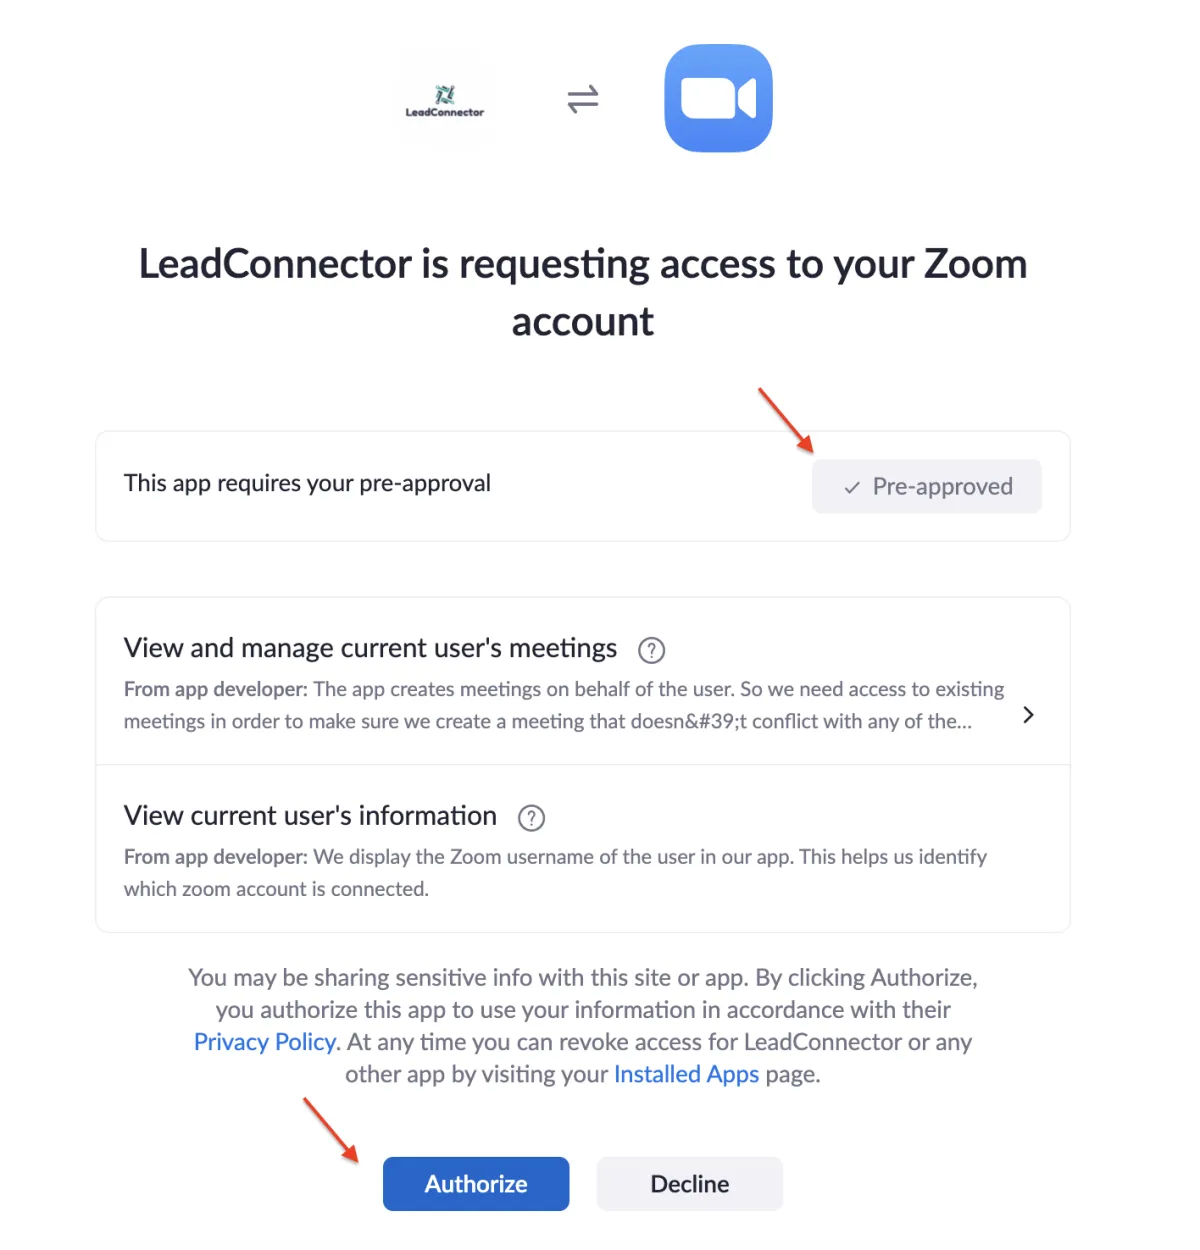
Once logged into Zoom, you'll see the system access request. Be sure the pre-approval is complete (if not you can click to do so.)
- Then click Authorize to confirm the integration.
- Navigate back to Settings > Profile.
- Scroll down to "Integrations" and you'll see the blue "Connect" button is now red and says "Disconnect", confirming the integration was successfully completed.
Step 2: Setting Up Zoom Links For Your Calendars
OPTION A: You can set User Availability to default to using dynamic Zoom links for all bookings.
- Under "User Availability" choose "Connect Zoom" and click "OK" in the confirmation window that pops up.

This will set up your system to use dynamic Zoom links for all calendar bookings.
OPTION B: Setting Up The Team Calendars Individually
- Navigate to Settings > Calendars.
- Create (or edit) a calendar for the team your user is assigned to.
- In Part 1 of the Calendar Configuration "Team and Event Setup", choose the Zoom calendar from the dropdown for your user.
- Fill out the rest of the fields to create (or edit) the team calendar.

Step 3: Testing the Calendar
- Click into the Team Calendar you just saved.
- Book an appointment.

- Navigate to Scheduling > Calendar
- Filter to the appropriate calendar from the dropdown at the top.
- Click into the test appointment you created. The "Meeting ID" will show your Zoom link.
NOTE: If using a team calendar, you can see Zoom meetings scheduled within the CRM displayed in your Zoom account. In your Zoom account, navigate to "Upcoming Meetings" and you'll see them listed here.
Setting Up Your Forms
Workflows
ABOUT THIS LESSON
How to Create and Use Workflows
This is an overview of the workflow builder. The workflow builder is a visual builder feature that allows you to combine trigger and campaign type features with some added functionality.
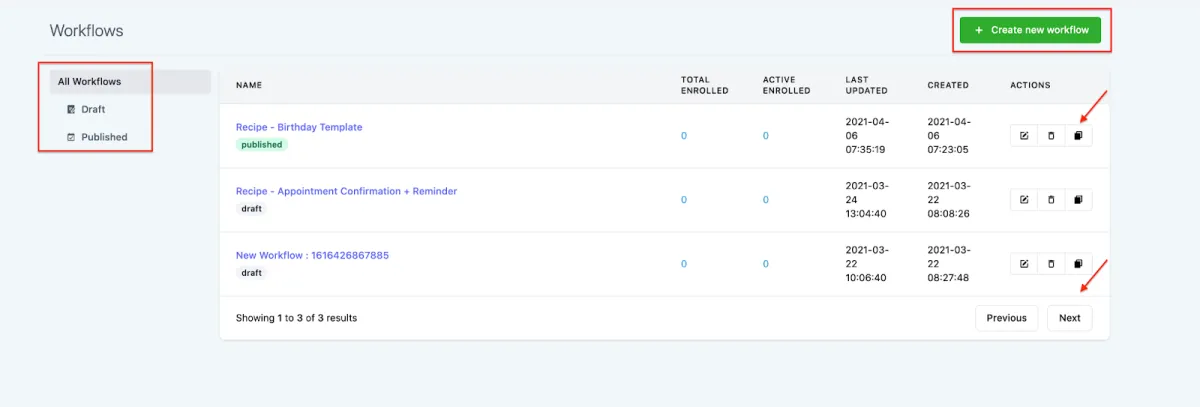
Step 1: Access the Workflow Dashboard
- Navigate to workflows, you'll end up on this Workflow Dashboard page. Here you’ll see drafted and published workflows.
- You can Create a New workflow using the green button at the top.
- You can also edit, delete, or copy existing workflows using the icons on the right side under “Actions”.
- Additionally, you can click through multiple pages if you have several workflows.
Step 2: Create a Workflow and Navigate through the Builder
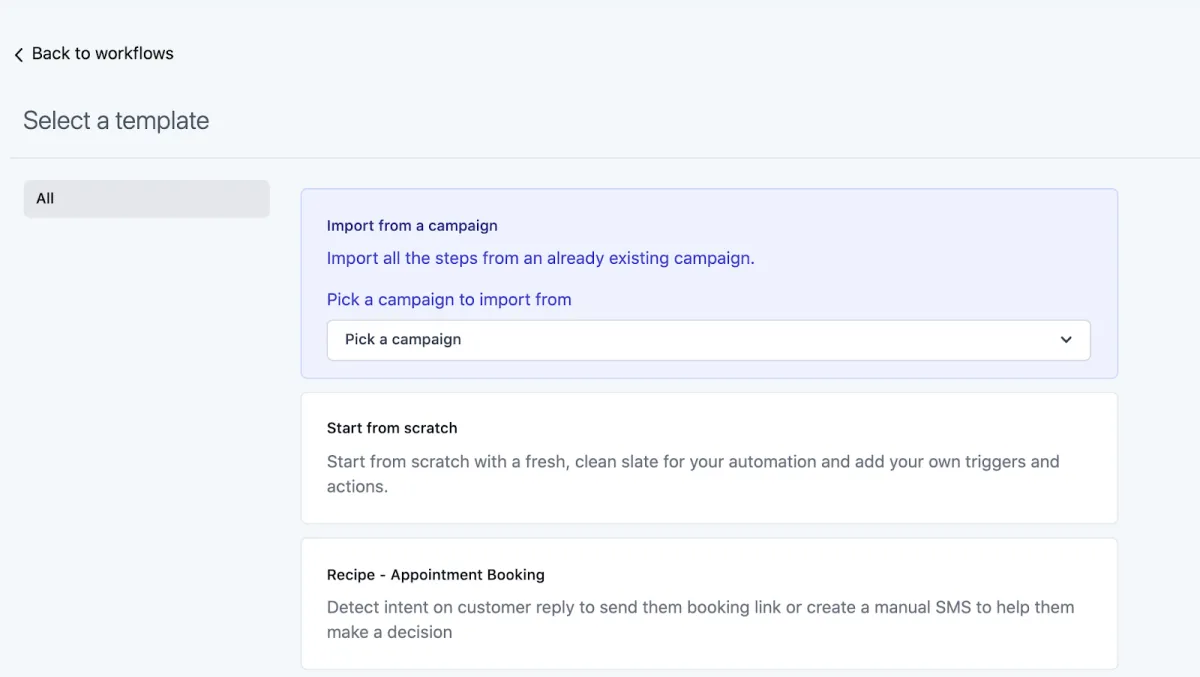
- Click the +Create New Workflow button in the top right of the screen.
- Choose an option for the type of Workflow you wish to create. You can import events from an existing campaign, start a workflow from scratch, or choose from preexisting ‘recipes’ or templates.
- Click the +Create New Workflow button in the top right of the screen again, to enter the builder.
- In the Workflow Builder, you can rename a workflow using the pencil icon next to the title.
- By default, you’ll be on the Actions page. You can click to toggle between Actions, Settings, History, and Status tabs. (We’ll explain each tab in a separate tutorial.)
- Add your trigger(s) and create your workflow. You can have multiple triggers fire off the same chain of events.
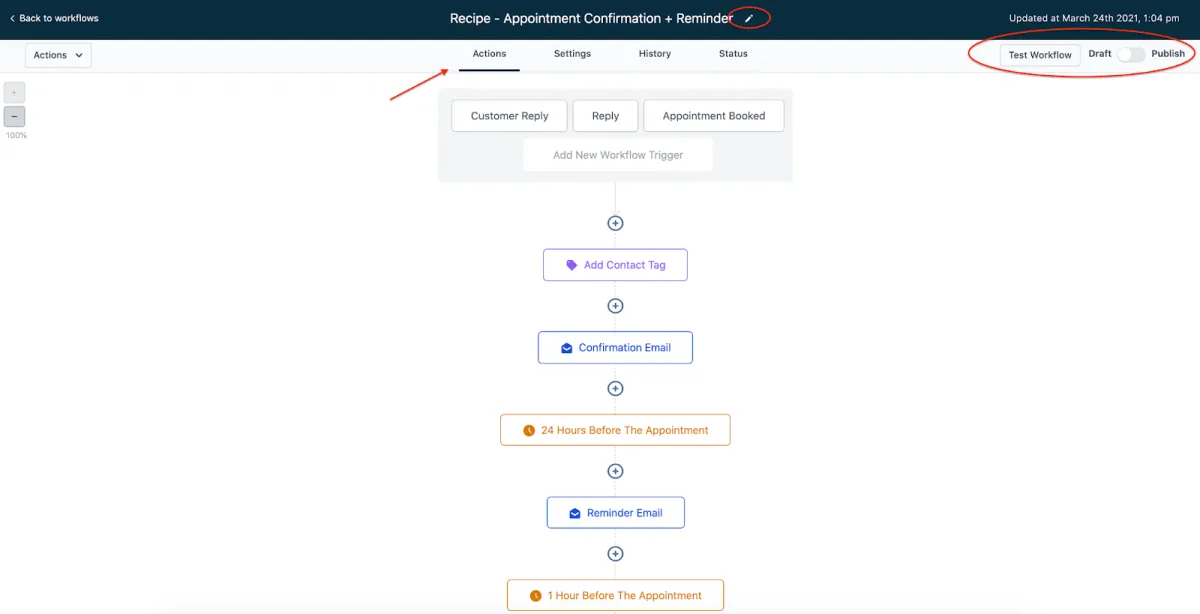
- In the top right, you can click the “Test Workflow” button. Save any changes, and then toggle the Workflow from Draft to Publish mode to activate it.
Step 3: Customizing Your Workflow Triggers
- Click the Add New Workflow Trigger in the gray box at the top of the builder.
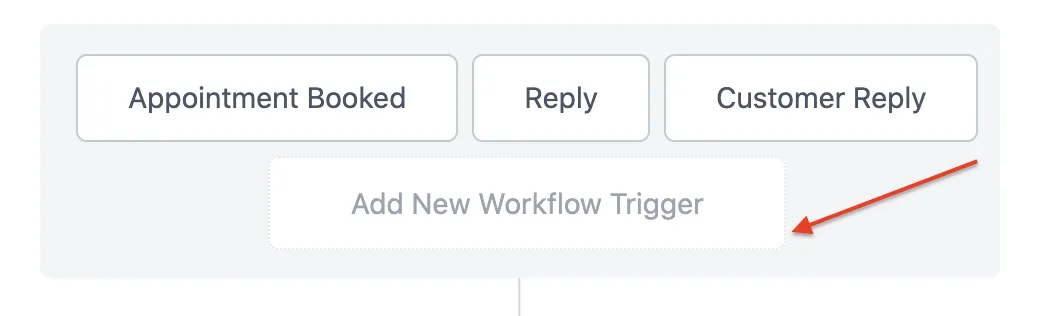
- Choose the Trigger type, and customize any needed filters.
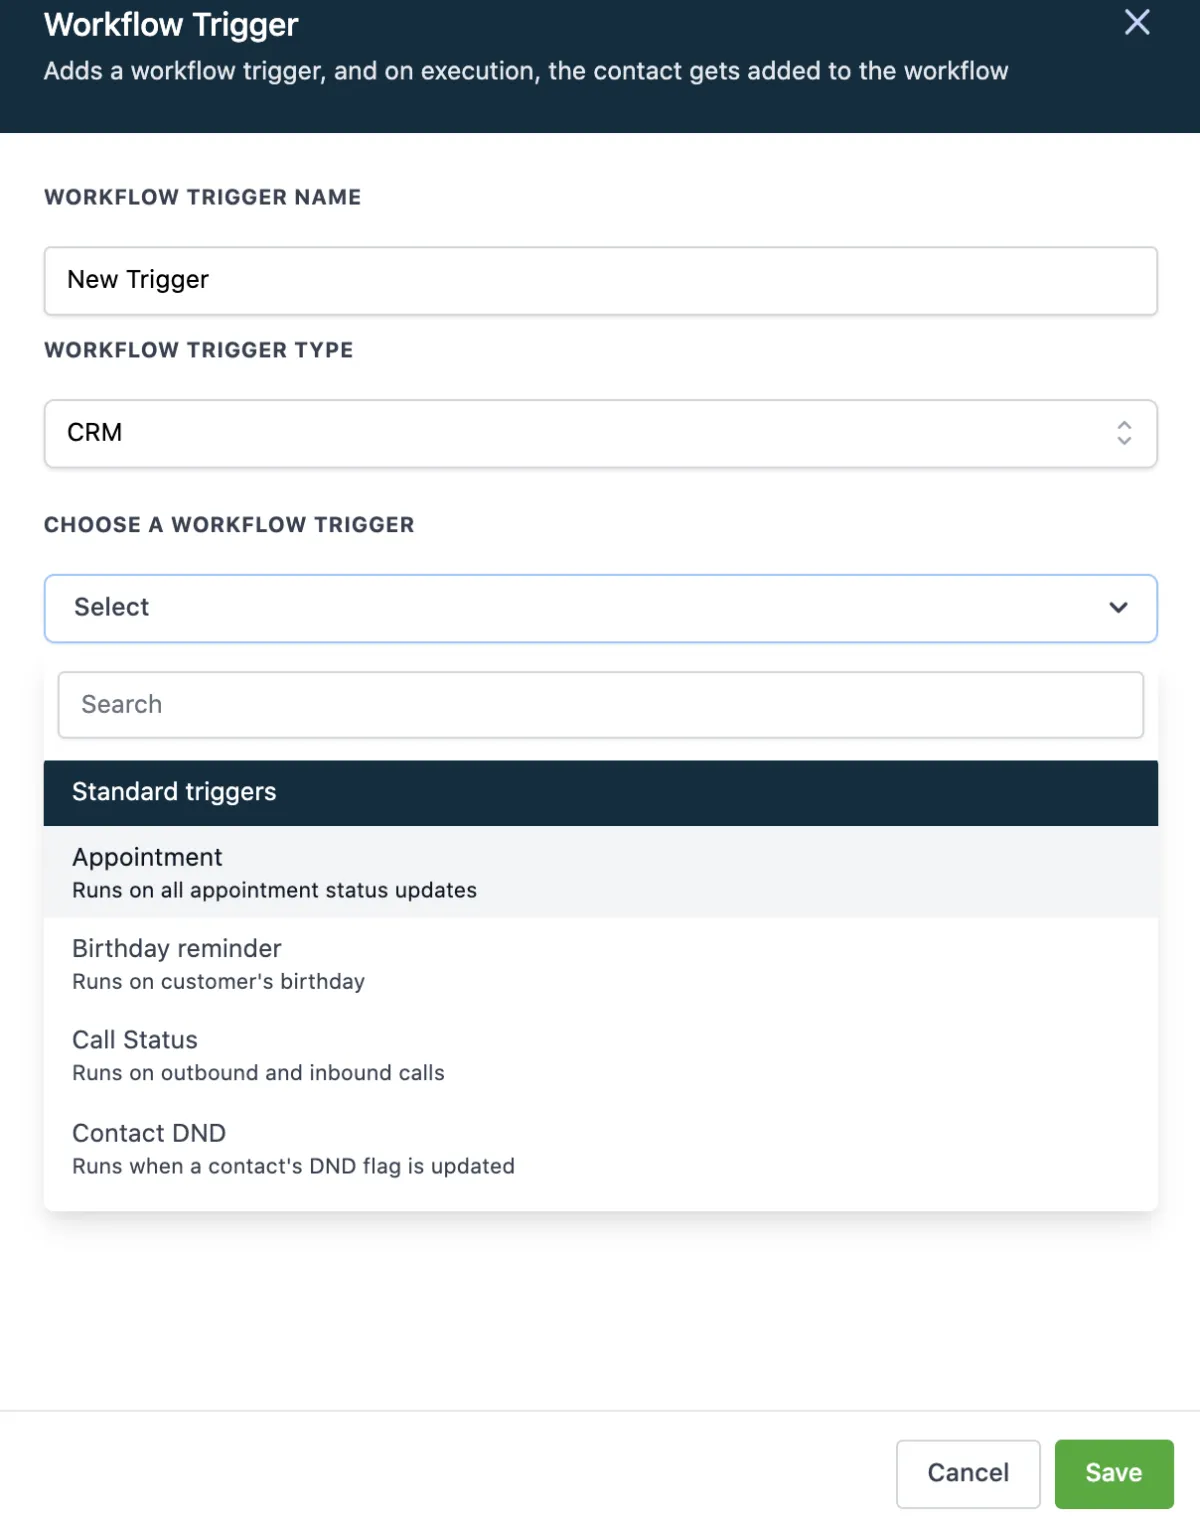
- Click Save and the trigger will be added to your workflow.
Note: a benefit of the Workflow feature is that you can have multiple triggers fire off the same sequence of events.
Step 4: Customizing Your Workflow Actions
Click the + to add a new event to the workflow. Choose and customize the action in the menu on the right.
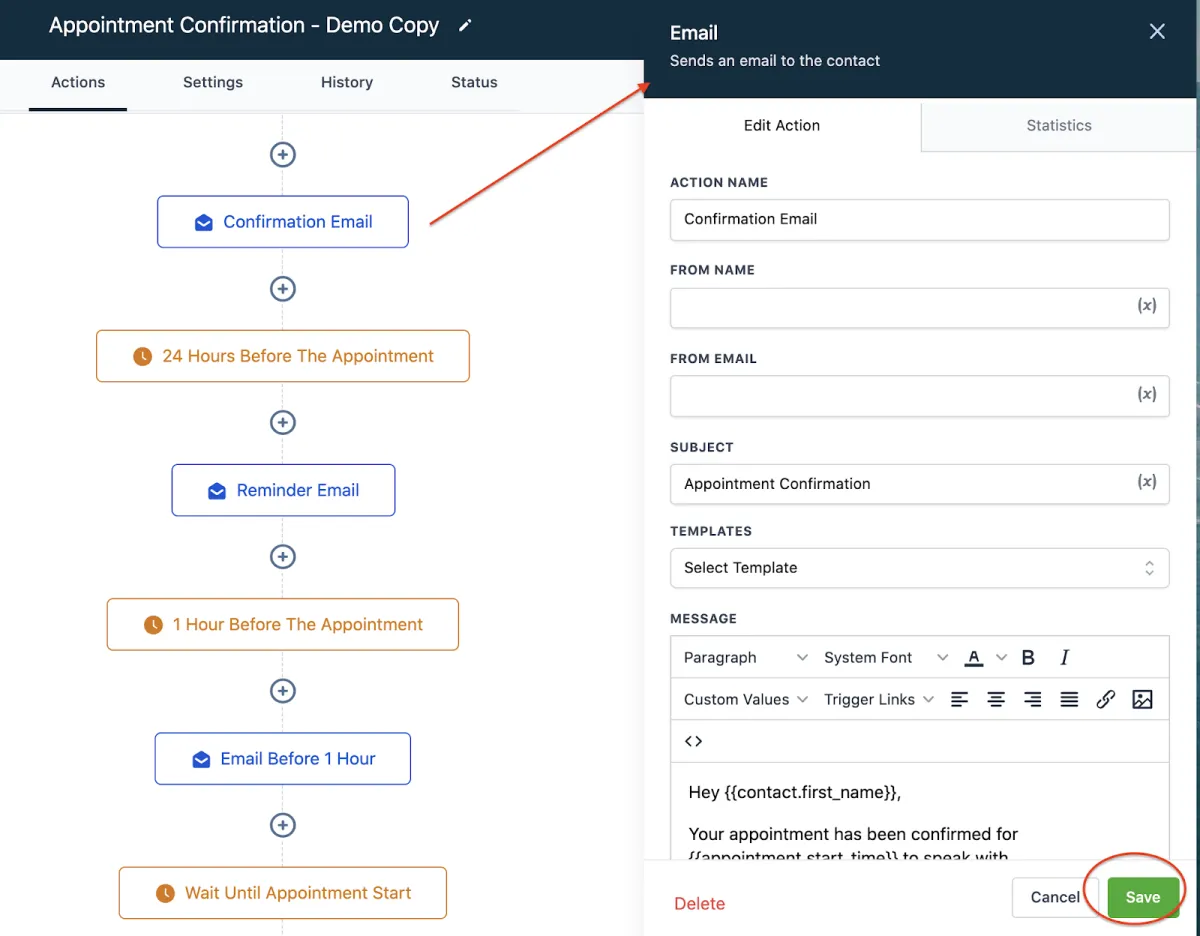
- Save to confirm the changes
- You can also click into an existing event to update it. Be sure to save any changes you make.
Note: the If/Else workflow condition is a new feature which allows you to take different paths, or chains of events, depending on specific conditions within the workflow. You can specify the path based on contact details, date/time, contact reply, or trigger, you can set up the various paths. For example, you may want the workflow to send people from a certain company down one path, and people from another company down another path. You can further customize the if/else conditions to include several filters if you wish.
Your Application Funnel
ABOUT THIS LESSON
Funnel and Funnel Builder Overview
Here's an overview of the funnel section, as well as the funnel builder where you can customize your funnel steps/pages.
Step 1: How to Navigate To and Utilize the Funnel Section
- Start by navigating to the funnels section. You can a view a list of your existing funnels here. Or, click the blue button to create a new funnel.
- Once you create a new funnel, you have to add a step. Each step is an actual page. (As an option, you can import pages in from ClickFunnels as well.)
- Use the different tabs to set up your funnel
- STEPS: Here you can view all your funnel steps, or pages.
- OVERVIEW: Edit or Preview your funnel step.
- PRODUCTS: View the products associated with the funnel page
- PUBLISHING: Here you can update the step name and path also known as the slug
- STATS: Here you can view the statistics for your funnel. like, a season, a time range of traffic that's been run into your funnel
- SALES: Sales is going to track any transactions that happen in the funnel, and there are other trainings on how to configure products and set this up in your funnel as well.
- SETTINGS: Update the Name, Path, Domain, and Favicon URL: the small icon that shows up in the web browser tab. You can also include Head and Body Tracking Code: These are scripts that run on each funnel step, like analytics or other features.
Step 2: Using the Funnel Builder To Create and Edit a Page
- Within the funnel builder, you can completely customize each step. From adding a calendar or map, to choosing fonts and colors, creating pop-ups, and more, you can choose exactly what your funnel steps look like.
- Each page is made up of the following pieces: Sections, Rows, Columns and Elements. They need to be created in that order. Sections can house multiple rows, rows can house multiple columns and columns can house multiple elements.
- Use the drag-and-drop features to add sections, rows, columns and elements to the builder, and use the edit menu on the left hand side for each specific piece to customize it as you wish.
- You can preview the page in its entirety to see what it will look like for your customers.
- Be sure to save any changes before leaving the builder to confirm the updates you've made.
Pro Tips for using the builder:
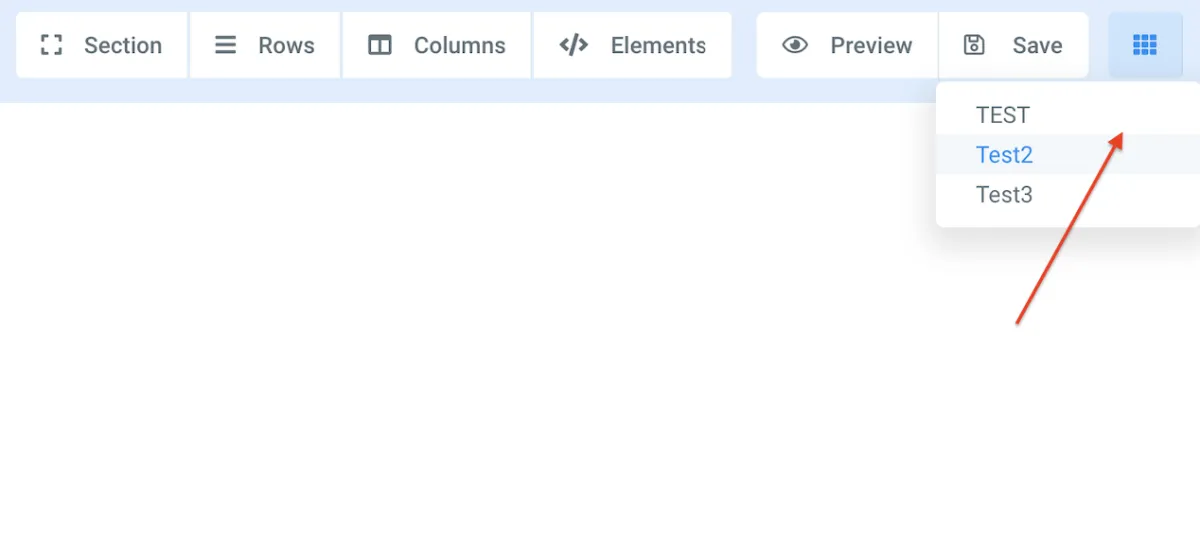
- Navigate from page to page within the builder: Use the icon with 9 dots in a square at the top right to go from page to page.
- Set a redirect action: In the builder, you can set a redirect action on a form, survey, button, calendar, etc.
